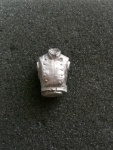
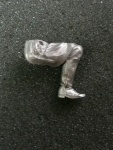
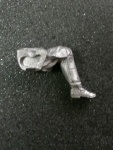
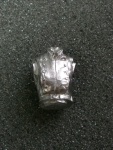
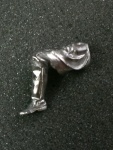
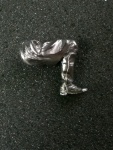
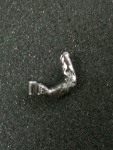
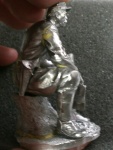
Hace unos meses me encargaron un nuevo boxart para una pieza de 120mm. En esta ocasión era para la marca británica Grenadier Miniatures. Y era un reto especial para mi, porque era la primera vez que iba a pintar un kilt; además con un tartan bastante complejo a mi entender como es el de Black Watch! A esto debía sumar la dificultad del tamaño de la pieza, pues en una escala menor sería fácil disimular un error en los cuadros… pero en una pieza de este tamaño, cualquier fallo sería muy evidente. De hecho, tuve que pintar el kilt hasta en cuatro ocasiones antes de conseguir un resultado decente en el dibujo!
Y sobre esto, querría dar las gracias a mi amigo Fernando, que estuvo asesorándome con la documentación histórica y el trabajo de pintura. Gracias a él he aprendido cosas nuevas en muchos aspectos.
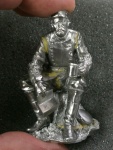
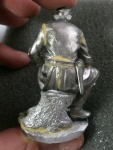
Sobre la figura, comentar que la escultura es de Moz Corry, un habitual de esta escala. La pieza se presenta en resina, con una muy buena calidad; y esta basada en una famosa foto de Roger Fenton.
Como siempre, ante cualquier duda, dejad un comentario!
———————————————————————————————————————————————-
A few months ago I was asked to paint a new boxart for a piece of 120mm. This time it was for the British brand Grenadier Miniatures. And it was a special challenge for me, because it was the first time I was going to paint a kilt, with a tartan pretty complex in my opinion as is the Black Watch! To this should be added the difficulty of the size of the piece, as on a smaller scale would be easy to hide a mistake in the squares … but on a piece of this size, any failure would be more evident. In fact, I had to paint the kilt four times before getting a decent result in the drawing!
And on this, I would like to thank my friend Fernando, who was advising me with historical documentation and the paint job. Thanks to him I learned new things.
About the figure, it was sculpted by Moz Corry, an usual at this scale. The piece is casted in resin, with very good quality, and it was based on a famous Roger Fenton‘s picture.
As always, if you’ve any questions, leave a comment!
That entry is to share my experience of testing on one of the latest products fromScale75, it’s the black primer.
At the beginning, this product was created for use with the airbrush, but as you can see it also works with the brush … and with very good results!
La entrada de hoy es para compartir mi experiencia de testeo sobre uno de los últimos productos de Scale75; se trata de su imprimación negra.
En principio este producto esta destinado para su uso con el aerógrafo, pero como podréis ver también funciona con el pincel… y con muy buenos resultados!!
Las principales cualidades de esta imprimación son la finura de su pigmento (que ayuda a que no queden tapados detalles finos) y su acabado absolutamente mate. Esto ayuda a que la pintura posterior agarre mejor y el riesgo de satinado se vea reducido. Además, al trabajarse también con el pincel, es ideal para imprimar pequeñas piezas que no montamos en un principio. Sobre su capacidad de agarre, es muy buena y no se desconcha; aunque como es natural, si rozamos en exceso sobre ángulos imprimados de la figura, la imprimación puede ir desapareciendo. Eso si, una vez pintado sobre ella con cualquier color, ningún roce hará que la pintura salga.
Para su aplicación con aerógrafo no es necesario que la diluyamos. Aunque si añadimos un par de gotas de agua destilada, ayudamos a que corra mejor y podamos trabajar mas rápido. Además, como su secado es bastante rápido una vez pulverizado, podemos podemos ir imprimando y secando casi al mismo tiempo.
Para su aplicación con pincel, pues igual. O bien la aplicamos directamente del bote o le añadimos un par de gotas para diluirla un poco. Esto no va a hacer que pierda opacidad (siempre que no nos pasemos!). Eso si, el tiempo de secado con el pincel es un poco mas alto, pero podemos acelerarlo con un secador de pelo.
En ambos casos, el acabado es el mismo. Una fina capa de imprimación resistente y mate.
Lo único que debemos tener en cuenta es que, cuando usemos el aerógrafo, no debemos demorarnos ni dejar la pintura mucho tiempo parada en la cazoleta, ya que empieza a secar y puede atascarnos el aerógrafo. Pero con un uso normal, veremos que su limpieza no difiere nada de la de cualquier pintura.
Un producto que recomiendo encarecidamente. He probado prácticamente todas las imprimaciones del mercado y en todos sus formatos… y ahora solo quiero usar esta!
Y como una imagen vale mas que mil palabras, os dejo un pequeño vídeo donde podéis ver ambas aplicaciones de esta imprimación.
The main qualities of this primer are its fine pigment (which helps fine details don’t be covered) and its absolutely matt finish. This helps to the paint for a better grip and the satin risk is reduced. Moreover, cos’ also work with the brush, is ideal for priming small parts that weren’t assembled at first. On its ability to grip, it’s very good and won’t peel off. And once you’d painted over it with any color, frictions won’t cause the paint peel off.
Isn’t necessary to dilute it when we use the airbrush to apply it. Even we can add a couple of drops of distilled water, it’ll help to run better the primer and we can work faster. Furthermore, as is pretty fast drying once you spary it, we can go priming and drying at about the same time.
The same for application by brush. We can use directly from the bottle or we can add a couple of drops to dilute it a bit. This will not cause to lose opacity.But the drying time with the brush is a bit higher, and we can speed it up with a hair dryer.
In both cases, the finish is the same. A thin layer and resistant matt primer.
The only thing to keep in mind is that, when we use the airbrush, we must not linger or leave much time the paint in the bowl as it starts to dry and can get bogged our airbrush. But with normal use, we’ll see that cleaning isn’t differs from any paint.
A product that I highly recommend. I have tried almost every primers and in all formats … and now I just want to use this!
And since a picture is worth a thousand words, I leave a small video where you can see both applications of this primer.
Esta idea nació hace ya bastantes meses, en concreto en Noviembre de 2012. Nos encontrábamos en Monte San Savino (Italia) y Piqui y yo estábamos haciendo una lluvia de ideas para un nuevo proyecto que siguiese la linea de la escena del elefante. Y fue entonces cuando dimos con una ilustración que nos llamó mucho la atención y que usamos como inspiración para esta nueva idea.
Una vez mas, buscamos hacer una escena poco convencional y alejada del belicismo habitual que encontramos normalmente. Una escena triste y al mismo tiempo emotiva. Diametralmente alejada de la anterior. Creo que no es necesario dar ninguna explicación acerca de ella; basta con observar los distintos elementos de la escena para poder imaginar la historia que nos cuenta.
Toda la escena esta construida por Piqui, a excepción del perro, para el que se usó un kit de Andrea Miniaturas. Y quizás sea ese, en mi opinión, el punto mas flojo de la escena. Aunque bastante bien conseguida, creo que el acabado general hubiese sido aún mejor si hubiésemos empleado otro perro o incluso mejor si Piqui hubiese modelado uno. En cualquier caso, nos ha servido para aprender de nuestros errores e intentar hacerlo mejor en la siguiente.
Aun con todo, creo que es una escena muy emotiva y que sigue una linea de las muchas que podemos encontrar en el modelismo.
This idea was born several months ago, in November 2012. We’re in Monte San Savino (Italy) and Piqui and I were brainstorming for a new project that followed the line of the elephant scene. And that’s when we found an illustration that caught our attention and that we used as inspiration for this new idea.
Once again, we make an unconventional scene and far away from the warmongering normally can see. A scene at the same time sad and emotional. Diametrically away from the previous one. I think that isn’t necessary to explain anything, just need to watch the elements in the scene to imagine the story that is telling us.
All the scene was made by Piqui except the dog, which was used a comercial kit from Andrea Miniatures. And maybe that, in my opinion, the weakest point of the scene. Although fairly well achieved, I think the overall finish would have been even better if we had used another dog or even better if Piqui have modeled one. In any case, has helped us to learn from our mistakes and try to do better in the next.
Even with all I think it is a very emotional scene and follows a line of many that we can be found in the modeling.
Hoy traigo una nueva pieza de una de mis marcas favoritas. Se trata de las tres últimas novedades que ha sacado al mercado Tommy’s War. Y con estas tres novedades comienzan su andadura en este 2013 (recordemos que no sacaban nada desde finales de 2012)
Y es una de mis marcas favoritas por las magníficas figuras que sacan al mercado, con unas esculturas increíbles de las manos de Nino Pizzichemi, con un nivel de detalle y acabado que abruma. Sin olvidar la magnífica calidad de sus copias y el precio de locura que tienen estas figuras de 54mm; apenas unos 17€. Eso si, si la primera guerra mundial no es lo tuyo…
Yo debo confesar que nunca he sentido mayor interés por este conflicto bélico… pero desde que comencé a trabajar con Tommy’s War, mis inquietudes por conocerlo mas a fondo han aumentado. De hecho, poco a poco voy aprendiendo cosas nuevas sobre su historia. Quizás eche en falta que se iniciase una linea sobre otros ejércitos involucrados en el conflicto (recordemos que Tommy’s solo se centra en el ejercito británico) y aunque quizás no todos, si tal vez algunas figuras del bando alemán o ruso, serían bastante interesantes. Pero, quien sabe? Quizás algún día.
Lo que hoy traigo se trata de tres piezas que se venden por separado, por lo que puede montar esta misma escena o jugar con distintas piezas para recrear tu propia escena!
Por un lado tenemos a un Capitán, del 2º regimiento de fusileros de Gales. Viste el clásico bedford breeches; un pantalón bombacho o abotinado, cuyo interior solía ser de cuero, pues era común que los oficiales se trasladasen a caballo. En la mano tiene un rifle Jeffery Farquharson, muy útil contra francotiradores enemigos (el rifle fue esculpido por Steve Readdie, aunque mi copia sufrió un pequeño accidente y tuve que retocarlo yo mismo). Se puede apreciar que el color de la chaqueta y el pantalón eran diferentes.
La otra figura representa a un Sargento del mismo regimiento, que viste una chaqueta de pelo, que podía ser de cabra u oveja. Se las conocía como stinker, si no estoy equivocado.
Sobre la sección de trinchera… pues que decir! La escena viene en dos piezas de resina e incluye varios elementos para decorarla; como una taza, un rifle, la campana o unos cascos… aunque se le pueden añadir otros muchos objetos para hacer una escena realmente chula! Yo decidí embarrar la escena un poco, pero tampoco quería pasarme, ya que la idea es que se vea el trabajo tal y como se puede adquirir… aunque no puedo negar que me quedé con ganas de añadir mas elementos!
A continuación, os dejo varias tandas de fotos. En la primera tenéis la escena completa y justo debajo las fotos completas de ambas figuras por separado. Como siempre, podéis comentar o dar vuestra opinión al respecto! Ah! Y esta, junto a otras piezas que ya hice, están expuestas en el stand de Tommy’s War, por lo que si coincidís con ellos en algún evento, podréis verlas de cerca.
————————————————————————————————————————————————
Today Ishow you a new releases of one of my favorite brands. These are the new three releases from Tommy’s War. And with these three news they begin their journey in 2013 (remember that they didn’t go out anything since the end of 2012)
It’s one of my favorite brands for the outstanding figures that goes on the market, with incredible sculptures by Nino Pizzichemi’s hands, with a level of detail and finish overwhelming. Not forgetting the superb quality of their castings and the price of madness that have these 54mm figures, only about 17 €.
I must confess that I’d never felt more interest in this war … but since I started working with Tommy’s War, my interest have been increased more to get more knowledge. In fact, I’m slowly learning new things about its history. Maybe they should to produce a line of other armies involved in the conflict (remember that Tommy’s are only focused on the British Army) but could be interesting to produce some figures of German or Russian armies. But, who knows? Maybe some day.
What I bring is three pieces that are sold separately, so you can do this same scene or play with different pieces to recreate your own scene!
On the one hand we have a Captain, 2nd Bn Royal Welsh Fusiliers. Wear the classic bedford breeches, a baggy trousers, whose inner protection is ussually leather, it was common for officers to ride horses. In his hand hold a Jeffery Farquharson rifle, very useful against enemy snipers (the rifle was sculpted by Steve Readdie, although my copy suffered a small accident and I had to fix it myself). You can see that the color of the jacket and pants were different.
The other figure represents a Sergeant from the same regiment, who wears a skin jacket, which could be goat or sheep. They were known as a stinker, if I’m not mistaken.
About the trench section … what can I say! The scene comes in two pieces of resin and includes several elements to decorate it, like a cup, a rifle, a little bell or two helmets … although you can add many other objects to make a really cool scene! I decided to muddy the scene a bit, but didn’t want to much, since the idea is to see the work over who you could buy… although I can’t deny that I was wanting to add more items!
Then I leave several pictures. In the first ones you’ll see the full scene and just below full pictures of both figures separately. As always, you can comment or give your opinion about it! Ah! and if you visit that weekend the BMSS Annual Show in London, you could see my works in the Tommy’s War stand!!
Hace unos meses me llegó un encargo sobre esta figura. La verdad es que me dio bastante pánico al principio, pero el tamaño y complejidad de la pieza.
La figura pertenece a la marca italiana Romeo Models y fué esculpida por Victor Konnov (un escultor cuyo trabajo me gusta especialmente). Una pieza que ya hace bastante tiempo que salió al mercado, pero de una calidad increíble.
La escala es de 75mm, con lo que os podéis imaginar el tamaño y el peso del dromedario!! Una pieza realmente difícil de manejar y de montar, debido al gran número de piezas que forman el kit; y que además deben ser colocadas en un orden específico si no queremos encontrarnos con problemas en el montaje. Hay que destacar el gran trabajo que hubo que hacer de reparación en la unión de las piezas del animal, así como la cantidad de pernos que fueron necesarios para evitar accidentes. Todo el kit es de metal, formado por un gran número de piezas…
Respecto al esquema de color, se me pidió que siguiera el mismo que en el box art, por lo que tuve poco margen de maniobras. Personalmente hubiese usado algo mas de color, para no hacerlo tan monótono. Como dije antes, lo mas complejo de pintar fue el dromedario, por su tamaño y excesivo peso.
Por último, señalar que toda la pieza está pintada con pinturas acrílicas, salvo el escudo y el terreno, en los que utilicé óleos y esmaltes.
A few months ago I received a commissioned on this figure. The truth is that I was pretty scared at first, but the size and complexity of the piece.
The figure was manufactured by the Italian brand Romeo Models and was sculpted byVictor Konnov (a sculptor whose work I particularly like). A piece that was released a long time ago, but superb quality.
The scale is 75mm, so you can imagine the size and weight of the dromedary! A piece very difficult to handle and assemble due to the large number of parts making up the kit, and also must be placed in a specific order unless we wanna get problems in assembly. We must highlight the hard work that I had to make repairs to the union of the parts of the animal, and the number of pins that were needed to avoid accidents. The whole kit is made of metal, consisting of a large number of pieces …
Regarding the color scheme, I was asked to continue the same as at the box art, so I had little creative options. Personally I would have used some more color, for not doing so monotonous. As I said before, the most complex painting was the dromedary, excessive in size and weight.
Finally, note that all the piece was painted with acrylic paints, except the shield and the ground, which used oils and enamels.
En el pasado concurso de Leganés, la marca Heroes&Villanos (H&V) presentó sus nuevos proyectos: Fahrenheit Miniatures y Peter Punk Produktions. Pero en elbackstage del stand ya estaba corriendo como la pólvora una nueva novedad de Peter Punk, que aún estaba por salir y que no vería la luz hasta casi un mes después. Yo tuve la suerte de ver esa novedad y debo decir que fue amor a primera vista. Pero tuve aún mas suerte cuando los chicos de H&V decidieron darnos una de esas copias exclusivas y antes de plazo para Piqui y para mi. Y era genial, porque era una figura que me gustaba mucho y me daba la ocasión de trabajar con mi atelier, una vez mas.
Así que, siguiendo nuestra tónica habitual de trabajo, dejé la figura en manos de Piqui y me desentendí de ellla. No pregunté por lo que estaba haciendo ni pedí fotos del proceso. Simplemente dejé hacer al maestro. Al final, todo el mundo había visto la escena de una u otra manera, menos yo…Entonces llegó el momento de la sorpresa. Y debo admitir que fue tan grata como grande. Piqui había creado una escena de aventuras clásica, digna de D&D!! Arañas gigantes, una mina (o dungeon), la tensión de la oscuridad…
Sobre la figura en sí, decir que fué esculpida por Jonatan Monerris y que es de una escala de 54mm. La figura esta producida en una resina de muy alta calidad.
La composición de la escena era perfecta. Mientras el enano está preocupado por las arañas que acuden desde el suelo, el verdadero peligro acecha en las sombras… una enorme araña amenaza a nuestro héroe. Todo ello dramatizado por la oscuridad de la mina y un único foco de luz que cae al suelo!!
Desde el primer momento tuve claro que la escena debía estar pintada con una luz dirigida, algo muy similar a lo que ya hice con la figura de Jack el Destripador. La parte mas complicada, al igual que la vez anterior, fue tener claro donde colocar las luces y las sombras, especialmente en la cabeza del enano. Y por otra parte no perder el rumbo, ya que los elementos se pintan separados, pero luego al unirlos todos, debe existir coherencia entre ellos.
En fin, espero que os guste la escena. Como siempre, podéis comentar, preguntar o criticar cuanto creáis. Al final de las fotos podréis ver un buen vídeo sobre la pieza, editado por Piqui.
Y si os interesa haceros con esta magnífica figura esculpida por Jonatán Monerris para H&V y Peter Punk, podéis hacerlo este mismo fin de semana en el AMT de Torrent, donde la pondrán a la venta o a partir del Lunes es sutienda online. No olvidéis que, como todas las piezas bajo el sello de H&V es una figura de tirada limitada! No os quedéis sin ella!
Por último, comentaros que estaré en el mismo concurso, junto a otros hermanos de manada como son Arsies, Piqui y Cris. Espero veros por allí!
——————————————————————————————————————————————-
In the last Leganes contest, Heroes & Villains brand (H&V) presented its new projects:Fahrenheit Miniatures and Peter Punk Produktions. But in the backstage of the stand was running like wildfire a new sculpture from Peter Punk, which wasn’t showed to the people and wouldn’t see the light until a month later. I was lucky to see that new and I must say it was love at first sight. But I was even more lucky when the guys fromH&V decided to give us one of those exclusive copies to Piqui and me. And it was great because it was a figure that I liked and gave me the chance to work with my atelier, again.
So, following our standard way of work, I left the dwarf in the hands of Piqui. I didn’t ask about what he was doing and neither asked for pictures of the process. Just let do his best to the master. In the end, a lot of friends have seen the scene in one way or another, but not me … Then came the moment of surprise. And I must admit it was so pleasing as great. Piqui had created a scene of classic adventure worthy of D&D! Giant spiders, a mine (or dungeon), the tension of the dark …
About the drawf. I can tell you that was sculpted by Jonatan Monerris and it’s 54mm scale. Also, it’s casted in a really amazing resin.
The composition of the scene was perfect. While the dwarf is worried about the spiders that come from the ground, the real danger stalks in the shadows … an bit spider threat to our hero. This should be dramatized by the darkness of the mine and a single spotlight that falls on the floor!
From the first sight I’d clear that the scene should be painted with a oriented light source, something very similar to what I did with the figure of Jack the Ripper. The trickiest part, like last time, was to be clear where to place the lights and shadows, especially on the head of the dwarf. And besides to stay tunned on the work, because the elements were painted separately, but when we’ll place them all together, there must be consistency between them.
Anyway, I hope you enjoy the scene. As always, you can comment, ask or critique as you may consider. You can find a video at the end of the pictures, really nice edited by Pqiui.
And if you want to buy this awesome figure sculpted by Jonathan Monerris for H&V and Peter Punk, you can do this weekend in the AMT Torrent contest, where will be on sale or next Monday in the H&V online store. Don’t forget that, as all the pieces under the seal of H&V are a limited edition figures! Do not stay without it!
Finally, I will tell you that I’ll stay in the same contest, with other brothers like Arsies, Piqui and Cris. Hope to see you there!
Esta figura seguro que os suena a muchos! Y es que es la tercera vez que la pinto!
La primera versiónfue la que pinté para participar con el equipo español en el World Nations Trophy, hace ya algunos años y que ahora descansa en la vitrina de mi amigo Piqui. La segunda versión la pinté con Arsies para una recaudación benéfica para ayudar en el tratamiento médico de una niña. Y esta tercera versión ha sido pintada para un coleccionista privado.
Lo cierto es que ha sido un trabajo muy ameno y divertido; porque es una figura realmente cómoda de pintar y en mi opinión, una de las mejores figuras de la linea de Warlord Saga de Andrea Miniaturas.
Como siempre, podéis comentar, preguntar y opinar cuanto queráis.
——————————————————————————————————————————————-
Most of you should know that miniature… cos’ it’s the third time that I painted it!
The first one was painted to entry in the spanish team to participate in the World Nations Trophy and now is place in the Piqui’s showcase. The second one was painted with my friend Arsies for a charitable cause, to collect money for a girl that needed a medical treatment. And that third version was a commissioned work to a private collector.
The truth is that it was a very enjoyable and fun, because it’s a really comfortable figure to paint and in my opinion, one of the best figures of the Andrea Miniatures‘ line Warlord Saga.
As always, feel free to comment, ask or give your opinion
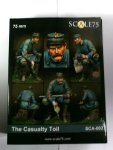
Vamos a realizar un OpenBox de esta figura histórica de la marca Scale75 que representa a un soldado de la guerra civil Americana. Como es habitual en esta marca la figura se suministra en metal blanco a escala 75mm.
Lo primero que podemos observar es la caja, bonita, robusta, con buena calidad de impresión. En el frontal encontramos una vista principal de la figura pintada de encarte, y en la parte trasera varios ángulos más de la misma figura de encarte. No hay pintura alternativa a cargo de otro pintor. Quizás se eche en falta el que no se especifique ni el escultor ni el pintor. Tampoco el ejercito o el regimiento al que pertenece la figura representada, ni el periodo; una información que para muchos profanos nos sería muy útil para buscar información antes de pintar la pieza.
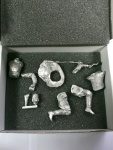
Al abrir la caja podemos ver las diferentes piezas que componen el kit. Dentro de la caja vienen las piezas y dos esponjas protectoras. El kit no es especialmente complejo de montar y siguiendo las fotos de referencia la tarea es mas sencilla.
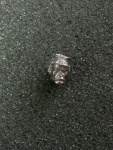
En este caso encontramos 10 piezas diferentes. Podemos ver en las fotos de detalle que el modelado es bueno, si bien el casting presenta algo de rugosidad o porosidad en alguna zona puntual. Este problema es fácilmente solucionable con un poco de putty de Tamiya diluido en acetona y aplicado con un pincel. Una vez seco, tras unos minutos, solo tendremos que pasar una lija suave y la superficie quedará pulida.
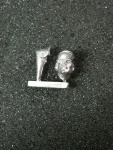
El encaje de las piezas es sencillo y bastante bueno, no presenta dificultades para el montaje, no hay que desbastar ninguna pieza ni realizar ajustes complejos, aunque en alguna zona hay que rellenar alguna unión con un poco de masilla. Un montaje agradable y que no supone nada fuera de lo normal en un montaje de tantas piezas.
Podéis ver en las fotos la figura montada y enmasillada. Algunos puntos están enmasillados para tapar los pernos exteriores, realizados después de montar la figura, me resulta más sencillo esta manera de pernar cuando el kit se compone de muchas piezas que deben encajar entre si, a pesar de que luego requiera algo más de trabajo de reparación.
Concluyendo creo que el kit es bueno, de calidad, elegante y a la vez sencillo de montar. Creo que se puede mejorar la porosidad del metal en alguna zona aunque no sea nada excepcional, en realidad son comunes en las figuras producidas en metal blanco, pero si hay posibilidad de mejorar este punto… tanto mejor! También sería interesante que incluyesen información dentro de las cajas referentes a las figuras, uniformología, etc.
Today we wanna share an OpenBox of this historical figure from Scale75 of the American Civil War. As usual the miniature is casted in white metal with a size of 75 mm.
The first thing we can see is the box, pretty, robust and with good print quality. On the front we find a main view of the painted figure, and in the back we can see several views of it. No alternative painting by another artist. Maybe I missed that isn’t specifiedthe sculptor or the painter’s name. Neither the army or the regiment to which the figure represented, or even the period, a lot of information that would be very helpful to profane painters to seek information before painting the piece.
Opening the box we can see the different parts of the kit. Inside the box are two sponges to protect the pieces. The kit isn’t especially complex to assemble and following the reference photos the task is easier.
In this case we found 10 different pieces. We can see from the pictures of detail modeling is good, but the casting has some roughness or porosity in some parts. This problem is easily solved with some Tamiya putty diluted in acetone and applied with a brush. Once dry, after a few minutes, just have to apply a soft sandpaper over the surface and it’ll be smooth and polished.
The fit of the parts is simple and quite good, not difficult to mount, do not grind any parts or complex adjustments, although in some area have to fill some union with some putty. A pleasant assembled work.
You can see in the pictures the figure assembled and repaired. Some points were fixed to plug the external pins, made after assembling the figure. I find it easier this way, to pin when the kit is made up of many parts that must fit each other.
In conclusion I think the kit is good quality, elegant and simple to assemble. I think they can improve the porosity of the metal in some areas but not anything exceptional, cos’ are actually common in the figures produced in white metal, but there is potential to improve this point … the better! also would be nice to add some info about the miniature inside the box.
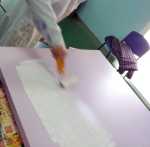
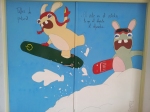
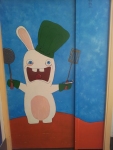
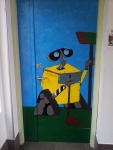
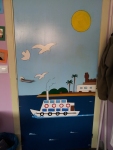
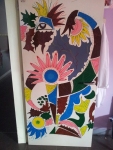
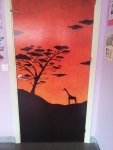
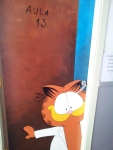
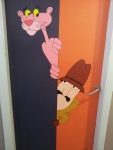
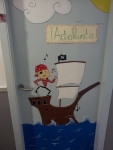
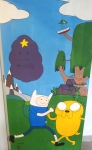
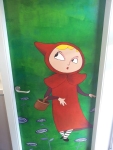
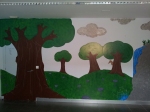
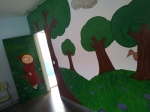
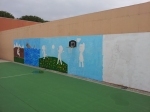
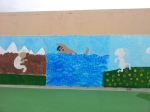
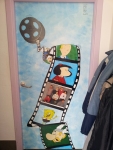
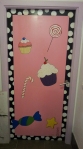
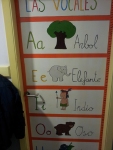
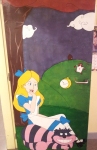
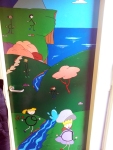
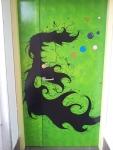
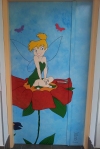
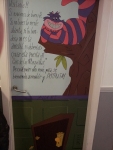
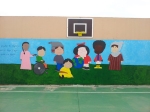
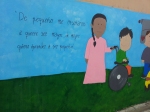
Hoy quiero hacer una entrada muy especial para mi. Algo que poco tiene que ver con las miniaturas, pero si mucho con la pintura, el arte, la imaginación y el esfuerzo personal y colectivo.
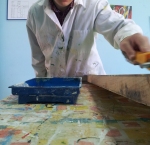
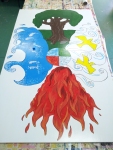
Como muchos ya sabéis, soy maestro de Educación Especial y trabajo en un colegio con niños con necesidades educativas especiales. Un trabajo muy interesante y que me apasiona mucho. Y uno de mis cometidos actuales con estos chicos es un taller de pintura. Un taller que se realiza desde hace ya casi cinco años, pero del que me hice cargo hace tan solo un par de años. Mi compañera predecesora hizo un gran trabajo enseñando la dinámica de trabajo y las técnicas básicas a los chicos; pintando muchísimos cuadros y realizando incluso algunas exposiciones. Y cuando yo llegué al taller, busqué la forma de darle un nuevo enfoque, para que a los chicos les resultase mas divertido aún y apreciasen las infinitas posibilidades que la pintura les ofrecía. De modo que decidimos pintar todas las puertas del colegio! una por una, pintamos las puertas de las aulas, despachos, salas… A veces nos pedían un dibujo concreto y otras veces no lo dejaban a nuestra imaginación. Y cuando acabamos con las puertas… empezamos con las paredes!
Y es que con trabajo en equipo, esfuerzo y pasión, todo el mundo puede hacer arte. Hoy estoy realmente orgulloso de poder compartir el trabajo de estos chicos tan especiales.
Today I want to write a post particularly special to me. Something that has little to do with the miniatures, but much with painting, art, imagination and personal and collective effort.
As many of you know, I’m a Special Education teacher and work in a school with children with special educational needs. An interesting work that I love very much. And one of my current tasks with these kids is a paint workshop. That workshop has been running for almost five years, but which I took as recently as a couple of years. My predecessor did a great job teaching the workflow and basic techniques to the boys; painting many pictures and even doing some exhibitions. And when I got the workshop, I was looking a way to give a new approach to the kids could more fun and even enjoy the endless possibilities that painting offer. So we decided to paint all the doors of the school! one by one, we painted the doors of classrooms, offices, rooms … Sometimes we specifically asked for a picture and sometimes not left to our imagination. And when the doors were finished … just start with the walls!
And is that with teamwork, effort and passion, anyone can make art. Today I am really happy and proud to share with you the work of these kids so special.
Aunque este no es el título original del kit (Duel of beast), me parecía mas adecuado dados los tiempos que corremos; donde nos ofrecen “pan y circo” para tenernos contento, callados y olvidando los verdaderos problemas que nos afligen. Práctica muy común en la antigua Roma, para distraer al pueblo de la política u ocultar hechos controvertidos; y que parece ser que no se ha olvidado…
Pero lo que nos interesa ahora es el kit. Se trata de una de las novedades de Febrero de la marca españolaScale75. Modelada magistralmente por Joaquín Palacios y con un gran trabajo de pintura por parte de Elías Alonso. En esta ocasión yo solo he realizado una versión alternativa para mi colección particular. Las figuras, a escala de 75mm, están presentadas en metal blanco con apenas imperfecciones, sello de calidad de la marca. Además, presenta dos opciones de cabezas distintas para el gladiador, una sin casco y otra con casco.
Sobre el proceso de pintura; desde Scale75 me comentaron que Elías iba a usar el clásico color del leopardo y me comentaron que podría intentar hacer un snow leopard; para hacerlo algo diferente. Y la verdad es que la idea y el reto me motivaron mucho. De modo que el siguiente paso fue buscar todas las fotos posibles sobre este animal, para poder tener referencias sobre su pelaje a la hora de pintarlo.
Lo siguiente fue llamar a mi compañero Piqui, para hablar del terreno. Después de una larga charla, me convenció de no limitarme al suelo de la arena… ¿por que no hacer parte del Coliseum? Y me pareció una locura magnífica, de modo que le mandé las medidas de la figura y el tamaño aproximado que necesitaría de terreno y lo dejé en sus manos. Cuatro días después tenía acabado este espectacular escenario! Y lo cierto es que la escena gana mucho mas con el escenario! Otro gran trabajo del mono-constructor!
Respecto al trabajo de pintura, es un humilde homenaje a uno de mis ilustradores favoritos: Simon Bisley. De modo que he tratado de impregnarlo todo (como he podido o sabido) del ambiente cromático que usa este gran artista. Quizás en las fotos finales no se aprecie tanto como en mano; sin embargo en las fotos de proceso hay primeros planos que pueden resultar muy interesantes.
Una pieza muy recomendada, especialmente divertida por las zonas de piel del gladiador, en la que se pueden hacer maravillas. Además, el brazo del gladiador esta modelado por completo, por lo que colocar el leopardo es una cosa opcional. Eso si, si optais por ponerlo, aseguraos de anclar bien las piezas si no queréis llevaros un disgusto!
Como siempre, sentiros libres de preguntar lo que queráis.
————————————————————————————————————————————————-
Although this isn’t the original name of the kit (Duel of beast), it seemed most appropriate due to the times we run, where they provide us “bread and circuses” to keep us happy, quiet and ignoring the real problems that afflict us. That was a common practice in ancient Rome, to distract the people from the political or hide facts in dispute, and that apparently has not forgotten …
But what interests us now is the kit. This is one of the new releases form the Spanish brand, Scale75. Modelled byJoaquin Palacios brilliantly and with a great paint job by Elias Alonso. This time I have only painted an alternative version for my collection. The figures, 75mm scale, are presented in white metal without imperfections, hallmark of the brand. It presents two different options for the gladiator heads, one without and one with helmet.
About the painting process, from Scale75 told me that Elias were painting the classic yellow leopard and told me I could try to paint a snow leopard, to do something different. And the truth is that the idea and the challenge motivated me a lot. So the next step was to find all possible pictures about this animal, in order to have references to his coat when painting.
The following was to call to my mate Piqui to discuss the base. After a long talk, he convinced me not to limit to the floor of the arena … Why not recreate part of the Coliseum? And it seemed crazy gorgeous, so I sent him the figure measures and the approximate size of base I needed and left it in his hands. Four days after he finished this spectacular set! Another great job of our monkey-builder!
Regarding the paint job is a humble tribute to one of my favorite illustrators: Simon Bisley. So I tried to permeate everything (as I could or knew) with the color atmosphere that use this great artist. Perhaps in the final pictures aren’t appreciated as much as in hand, in the photos of the work in progress you can find close-ups that can be very interesting.
A highly recommended piece, especially fun for gladiator skin areas. In addition, the arm of the gladiator is modeled completely, so uset the leopard is an optional thing. Of course, if you opt to use it, be sure to pin those parts if you wan’t to have a dislike!